Well, I hadn’t intended to start this blog with such a big project – I’ve never refinished a piece of furniture before so it was a bit of an experiment – but I had a couple of things on the go simultaneously and this was the one that got finished first. I wasn’t very consistent about photographing the process, so that aspect’s a bit choppy; please bear with it!
We had accidentally broken a couple legs off my wardrobe when we were moving into our house after we got married, and since then it had been propped up somewhat precariously on a stack of books, so when I saw that someone had posted a “small wardrobe” on freecycle I snapped it up. I was a little less excited when I went to the poster’s home to pick it up and realised it looked like this:
(Yes, I accidentally took the picture from the back instead of the front because I’m intelligent like that. The point is, it came in two separate pieces and looked pretty battered.) Its redeeming factors were that it had originally been bought in the 1930s, that the owners also threw a beautiful old dining chair into the bargain (more on that in a later post), and that it had these two carvings in the front. I’m a sucker for pairs or sets of things that don’t exactly match, so I was completely sold on the carvings.
I kept it in two parts the whole time I was working on it, largely because it fit better in the garage like that, then assembled it upstairs once it was completely done. I started by stripping the original finish using Colron Furniture Stripper. As I said, I’d never done anything like this before and didn’t realise I’d need about 2 litres of the stuff (Girls, it’s not blusher; less is not more, so buy about double what you think you’ll need). Between the stripper, a bunch of wire wool, and some elbow grease, we managed to get most of the varnish off. I also removed the mirror from the inside of the front door because it was ugly beyond redemption. Then I ran my orbital sander over the whole thing to smooth it out, and painted it with a coat of white primer.
Once all the primer was dry, I painted the outside with a tin of light cream gloss that I had leftover from some earlier house-painting project. I painted the inside with a matt paint in a similar colour.
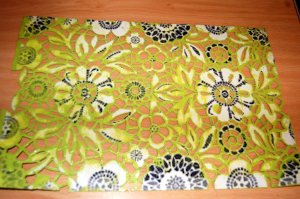
Now, earlier that week, I’d been smitten by a stencil I’d seen online called Skylar’s Lace. Unfortunately, the Royal Design Studio’s prices didn’t really feature in my budget for this wardrobe, so I set about making my own. I ran a Google image search for Skylar’s Lace, then edited the image in photoshop to simplify the design (and to appease my conscience, which was suggesting that it might be stealing to use the image as-is). I printed the modified design out on A3 paper and laminated it, then used a craft knife to cut it out. This took about 2 hours total.
I used repositional adhesive spray and a mini paint roller to stencil this onto the inside of the wardrobe using Dulux paint in Indian Ivy, which is kind of a luminous, lime green. I know nobody sees the inside of your wardrobe except for you, but that’s kind of what I like about it. I only remembered to take a photo of the stencil itself after I’d used it a couple times, so that’s why it’s a little green. As you can see, I simplified it again when cutting it out and skipped some of the tiny, detailed parts.
By this point I was definitely starting to be happier about the way the wardrobe was looking, but it still looked kind of “cleaner” than what I was going for. I lightly distressed the gloss paint on the outside by running my sander over it again to “rough up” the surface a little and, in places, expose the bare wood underneath. I mixed up a light brown wash using heavily diluted acrylic paint, soaked a cloth in this, and ran it over the surface of the wardrobe in places, to dirty the whole thing up a little.
This wardrobe is significantly smaller than my previous one, so it then had to sit in the garage for about 3 weeks while I reluctantly purged about a third of my clothes. Adam kindly gave up a half his weekend to help me dismantle the old wardrobe, lug this one painfully up the stairs (suddenly Ikea’s love affair with MDF makes a whole lot more sense. Real wood is heavy!), and assemble it in our room.
Aaand….
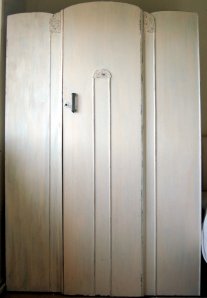
This was the final result! It’s not perfect, but for a first furniture project, I was pretty happy with it.


